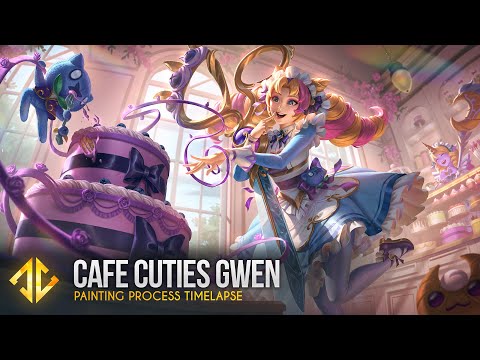
Here is Cafe Cuties Gwen! I was lucky to be asigned this task! I always wanted to try to paint a kawaii character. I've been doing lots of monsters and serious looking characters so, this was a nice change. :)
I got the briefs a bit late here so I rushed making 5 thumbnails in just 2 days. Fortunately, thinking of poses was not that hard because there are so much available maid cafe references out there! The client liked two of my thumbnails and we sort of mixed the energy from the other one into this one. That was challenging because she was already leaning on her scissors in this version and it was tricky to do an energetic pose with one leg up. It can easily feel wrong if I think about it logically but in this case, I prioritized the feeling of the pose.
I did lots of 3D again for this. I played around with some background variations in 3D. I hate drawing straight lines for architecture so 3D solved it for me. For the lighting, I actually wanted the direct lighting hitting her face but we went with the standard back/rim light instead. The face had lots of revisions as usual but I like how it turned out! XD
______________________________________________________
𝗠𝗬 𝗧𝗨𝗧𝗢𝗥𝗜𝗔𝗟𝗦 𝗔𝗩𝗔𝗜𝗟𝗔𝗕𝗟𝗘 𝗛𝗘𝗥𝗘 !!
• https://www.artstation.com/a/1142983
𝗔𝗙𝗙𝗜𝗟𝗜𝗔𝗧𝗘 𝗧𝗨𝗧𝗢𝗥𝗜𝗔𝗟𝗦:
Level Up Your Digital Painting Skills: Beginner to Advanced by 黄裕仁Fishman
(Add the Coupon code: WFR15 to get a discount! )
• https://www.wingfox.com/c/8294_33516_9603
______________________________________________________
𝗣𝗮𝗶𝗻𝘁𝗶𝗻𝗴 𝗯𝘆: David Villegas (Deiv Calviz)
𝗜𝗻 𝗖𝗼𝗹𝗹𝗮𝗯𝗼𝗿𝗮𝘁𝗶𝗼𝗻 𝘄𝗶𝘁𝗵 𝗥𝗶𝗼𝘁 𝗚𝗮𝗺𝗲𝘀
𝗖𝗹𝗶𝗲𝗻𝘁: Riot Games
𝗥𝗶𝗼𝘁 𝗚𝗮𝗺𝗲𝘀 𝗔𝗗: Jessica Oyhenart
𝗪𝗲𝘀𝘁 𝗦𝘁𝘂𝗱𝗶𝗼 𝗔𝗗: Mingchen Shen
𝗙𝗶𝗻𝗮𝗹 𝗣𝗼𝗹𝗶𝘀𝗵: League Splash Team
______________________________________________________
𝗙𝗢𝗟𝗟𝗢𝗪 𝗠𝗘 𝗛𝗘𝗥𝗘:
• INSTAGRAM: https://www.instagram.com/deivcalviz/
• TWITTER: https://twitter.com/DeivCalviz
• FB: https://www.facebook.com/DeivCalviz/
• PORTFOLIO: http://www.deivcalviz.com
______________________________________________________
𝗦𝗣𝗟𝗔𝗦𝗛 𝗙𝗔𝗤
► A splash takes 4-5 weeks. 1st week for multiple sketches. 2nd week to figure out the colors. 3rd to 5th week to render and polish.
► I paint with the canvas size 8,000 x 4,500 px but it is shrunk down to 7,000 x 3938 for final.
► This video is 40x speed up. Do the math based on this video's time. Usually, the real time is around 40-80+ hours. (if the other thumbnails were added in). Actual work hours are more than 100+ hrs when you factor in the other thumbnails, research, and contemplating time.
► The toolbar at the left side is called Lazy Nezumi. It helps me get smoother lines and have perspective guides.
► To quickly color a grayscale, I use two methods.
GRAYSCALE COLORING 1ST METHOD:
• Layer on top: The grayscale set to multiply. Brighten it up and colorize depending on the mood you want. This Acts as an AO pass.
• Layer below: Use a solid brush to paint in the flat local colors.
GRAYSCALE COLORING 2ND METHOD: (Messier)
• Layer on top: Set this layer to softlight and add in your colors. This makes it a bit look dull on the highlights so you need to manually fix the highlight colors.
• Layer below: Grayscale here.
► Tip for revisions. You can use liquify on multiple layers. Right after you do it on one layer. You can press Alt+Ctrl+F to apply it again to a different layer. Make sure not to deselect your selection if you are doing this.
► I use color dodge and sometimes linear dodge blending mode to add in lighting layers.
► I group layers using this logic:
1. Post processing
2. VFX, magic
3. Character
4. Some fog
5. Background people, elements, etc
6. Sky and far background
► Here are my tools:
2008-2020:
• Wacom Intuos 3 6″x8″
• Samsung T190
• Intel Core i7 3.50GHz, 16GB RAM, Windows 7
• Photoshop CS6, DAZ 3D, Alchemy
2021:
• XP Pen Artist 24 PRO
• Dell UltraSharp
• AMD Ryzen 7 3700X 8-Core, 32 GB RAM, Windows 10
• Force Series Gen.4 PCIe MP600 500GB NVMe M.2 SSD (this is important for faster everything)
• Photoshop CC, Daz 3D, Zbrush, Maya
► To open a second window of your artwork in Photoshop it is located in Window - Arrange - New Window.
► To temporarily convert your artwork into grayscale. Go to View - Proof Setup - Custom - Select Dot Gain 20%. Then Press Ctrl + Y to toggle this view.
► I am not going to upload longer or shorter versions of this because that takes too much of my personal time. I'm already giving this away for FREE.
0 Comments